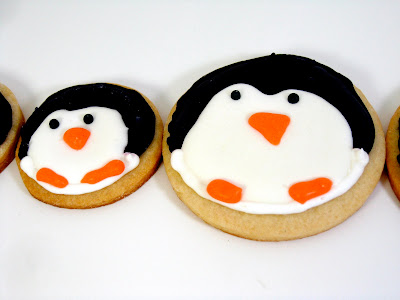
As you may be aware, pigs and penguins are close allies.
We are both highly stealthy and have many secret skills which we cannot tell you about.
There is however one skill we can safely tell you about - that is our cookie baking prowess.
As part of the cookie extravaganza (still running since last December), we invited our penguin friend Skipper to help us with the sugar cookies.
As you will see, Skipper did very little work. Other than posing with the cookies. He was very good at that. I was in charge of all the decorating. Cal helped some.
I will give Skipper credit for finding the idea though. He found it at The Crafty Penguin blog (not surprisingly, one of his favorite blogs).
We decided to do a sugar cookie instead of the gingerbread, and we used the basic recipe from Bake at 350. (If there were a kingdom of cookies - which I really wish there was -, this blogger would be it's queen. Her site also has a ton of good cookie tips!)
Our last source of the evening is Wilton, who's basic royal icing recipe we used.
(Pigs and penguins may be a little evil, but we don't plagiarize!)
cookie ingredients
3 c flour
2 tsp baking powder
1 c sugar
2 c salted butter, cold
1 egg
3/4 tsp vanilla
1/2 tsp almond extract
icing ingredients
1 lb confectioners sugar
3 Tbsp meringue powder
6 Tbs water
black and orange gel food colors
instructions
1. Cream butter and sugar.
2. Add egg and extracts and mix it up.
3. Mix together your flour and baking powder in a bowl. Add flour mixture to the creamy mixture a scoop at a time. Beat until just combined. Make sure to scrape down the bowl as you go!
4. Knead the dough together a bit with your hands as you scoop it out of the bowl. It's ok that it's a little crumbly.
5. Roll out onto a lightly floured surface to about 1/4" thick.
6. Cut out assorted sized circles for assorted sized penguins.
7. Line your baking sheets with parchment and preheat the oven to 350.
8. Place cookies on a sheet, then freeze it for 5 minutes.
9. Bake 10-12 minutes.
10. Cool on sheet 2-3 minutes.
11. Transfer to cooling rack to cool completely.
So now you have a bunch of round sugar cookies. Resist the temptation to eat any before you turn them into penguins. Trust us, penguin cookies taste much better than plain cookies.
12. Beat your icing ingredients until it looses it's shiny-ness. This takes 7 or so minutes which an electric hand mixer.
13. Separate the icing. Color a small amount orange, and then 1/2 of the remainder black.
Cornelius' tip: it's really really hard to get a true black. You must use high quality colors. Even so, it took us an entire jar of black, plus some brown to get a nearly black color. It looked purple when we piped it on there, luckily it dried blacker. Purple penguins would have been fun though. Be sure to cover the icing you are not using with a damp paper towel so it does not dry out.
Cal's tip: An easy way to fill a piping bag!
14. First, pipe the black part of the penguin. Fill a few scoops of icing into your bag with a thin tip. Pipe the outline first.
15. Reserving a small amount of the thick black icing for the eyes, add water a tsp at a tiem to the black to thin it for flooding. Go back and flood the penguins to fill their black parts. You might need to use a toothpick to pull the icing into the edges.
16. Ok now you have to wait a while - at least a few hours, preferably overnight.
17. Now you are ready to do the white part of the penguin. Again, outline the area first.
18. Then, thin the icing and flood!!!!!
19. Now you wait again. Come back the next day.
20. Time to add the eyes, feet and beak! Make your penguins cute.
21. Wait at least a few hours for all of the icing to be set before you bag them up if you are gifting them. Otherwise, you may now eat your penguins!
pig, out!


simply adorable and what a clever pig
ReplyDeleteThose are precious!
ReplyDeleteI'm loving your blog, just too cute!!
Reminds me of "Pingu", a childhood claymation favorite.
ReplyDeleteLove these, kids and adults alike! =)